
How to Set Up Your Refillable Pod Kit for the First Time
- by sohail zafar
-
If you have just bought a refillable pod kit, you might be wondering how to set it up correctly. The good news is that most refillable pod kits are very simple to use, even if you are completely new to vaping.
Setting up your pod kit the right way is important. It helps prevent burnt coils, improves flavour, and makes your device last longer.
In this guide, we will walk you through every step of setting up your refillable pod kit for the first time.
What Is a Refillable Pod Kit?
A refillable pod kit is a vape device that uses a refillable pod instead of disposable pods. You fill the pod with your favourite e-liquid and replace the coil or pod when it reaches the end of its life.
Many vapers prefer refillable pod kits because they:
-
Cost less over time
-
Offer more flavour choices
-
Produce better flavour
-
Create less waste
-
Allow more control over nicotine strength
Whether you have bought a Vaporesso, Uwell, OXVA, Voopoo, or any other refillable pod kit, the setup process is usually very similar.
What Comes Inside the Box?
Most refillable pod kits include:
-
The vape device (battery)
-
One or two refillable pods
-
Built-in or replaceable coils
-
USB charging cable
-
User manual
Before you begin, make sure all parts are included and undamaged.
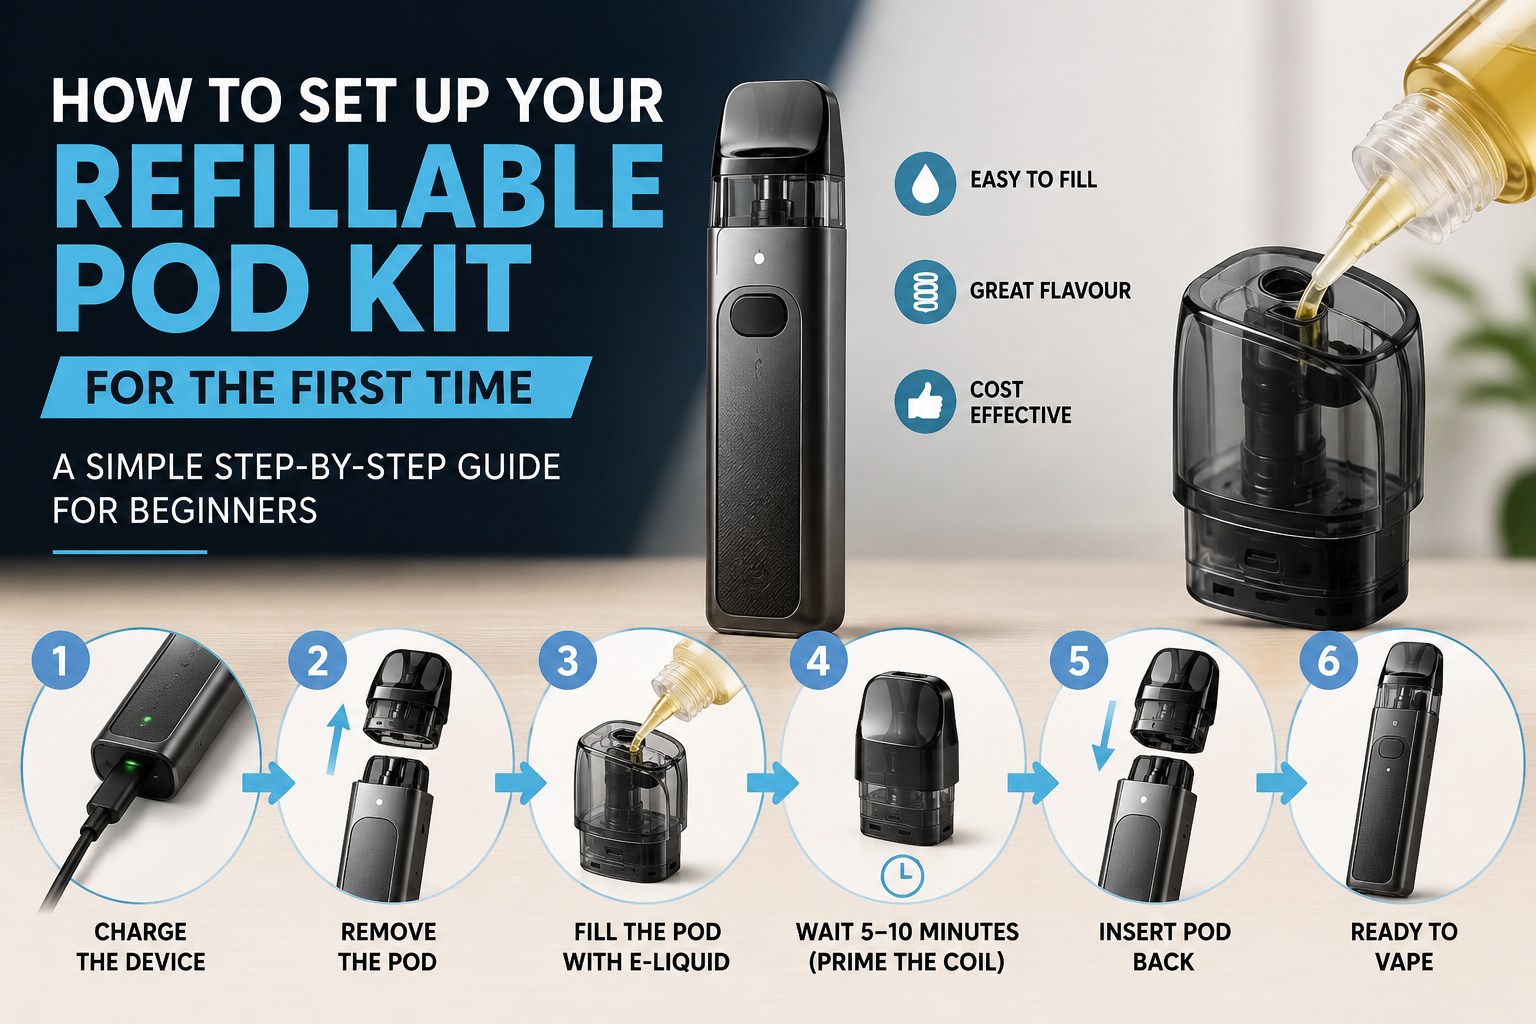
Step 1: Fully Charge the Device
Before using your pod kit for the first time, charge it fully.
Connect the charging cable to the device and plug it into a suitable power source.
Most modern pod kits use USB-C charging and can take anywhere from 30 minutes to 2 hours to fully charge.
A fully charged battery provides better performance and helps you enjoy your first vaping experience without interruptions.
Step 2: Remove the Pod
Take the pod out of the device.
Most pods simply pull out from the top of the vape. Some may use magnets to hold them in place.
Check the pod carefully and remove any protective stickers, rubber plugs, or packaging materials before filling.
Many new users accidentally leave these in place, which can stop the pod from working properly.
Step 3: Fill the Pod With E-Liquid
Locate the filling port on the pod.
Depending on the device, the filling port may be:
-
On the side of the pod
-
On the top of the pod
-
Under a rubber stopper
Open the filling port and slowly fill the pod with your chosen e-liquid.
Do not overfill the pod. Leave a small amount of space at the top to prevent leaking.
Once filled, securely close the filling port.
Step 4: Prime the Coil
This is one of the most important steps.
When a coil is new, the cotton inside it is completely dry. If you vape immediately after filling the pod, the cotton may burn.
To avoid this, you need to prime the coil.
After filling the pod:
-
Leave the pod standing upright
-
Wait 5 to 10 minutes
-
Allow the e-liquid to soak into the coil
This helps the coil absorb enough liquid before use.
Skipping this step can cause a burnt taste and may ruin a brand-new coil.
Step 5: Insert the Pod Back Into the Device
Once the coil has been primed, place the pod back into the device.
Make sure it fits securely.
Most refillable pod kits use magnetic connections, so the pod should click into place easily.
Step 6: Turn On the Device
Many pod kits are draw-activated, meaning you simply inhale to use them.
Others have a power button.
If your device has a button, it usually turns on by pressing the button five times quickly.
Check your device manual if you are unsure.
Step 7: Adjust the Power Settings (If Available)
Some refillable pod kits allow you to adjust wattage or power settings.
If your device has adjustable power:
-
Start at the lower end of the recommended range
-
Take a few puffs
-
Gradually increase if needed
Starting low helps protect the coil and allows you to find your preferred vaping style.
If your pod kit automatically adjusts power, you can skip this step.
Step 8: Take Your First Puff
Now your pod kit is ready to use.
Take a gentle puff rather than a hard inhale.
Unlike cigarettes, vaping works best with slow and steady draws.
You should notice smooth vapour and good flavour.
If the flavour seems weak, allow the pod to sit for a few more minutes before trying again.
Common Mistakes to Avoid
Not Waiting After Filling
Many new users fill the pod and vape immediately.
This can burn the coil and ruin the flavour.
Always wait at least 5 to 10 minutes after filling.
Using the Wrong E-Liquid
Different pod kits work better with different e-liquids.
Most refillable pod kits are designed for:
-
50/50 e-liquids
-
Nicotine salt e-liquids
Check the manufacturer's recommendations before filling your pod.
Letting the Pod Run Empty
Never vape when the pod is nearly empty.
Keep some e-liquid inside the pod at all times to prevent the coil from drying out.
Chain Vaping
Taking many puffs in a short period can overheat the coil.
Leave a few seconds between puffs to allow the coil to absorb more e-liquid.
How Long Does a Coil Last?
Most coils last between 1 and 2 weeks, depending on:
-
How often you vape
-
The type of e-liquid you use
-
Your power settings
You may need a new coil when you notice:
-
Burnt taste
-
Reduced flavour
-
Less vapour production
-
Gurgling or leaking issues
How to Keep Your Pod Kit Working Well
To get the best performance from your refillable pod kit:
-
Keep the pod topped up with e-liquid
-
Charge the battery regularly
-
Clean the pod contacts occasionally
-
Replace coils when needed
-
Store the device upright when possible
Regular maintenance helps improve flavour and extends the life of your vape.
Final Thoughts
Setting up a refillable pod kit for the first time is much easier than many people think. By charging the device, filling the pod correctly, priming the coil, and using the right e-liquid, you can enjoy a smooth vaping experience from day one.
Taking a few extra minutes during setup can help prevent leaks, burnt coils, and poor flavour. Follow the steps in this guide, and your refillable pod kit will be ready to deliver great performance from your very first puff.
Frequently Asked Questions
1. How long should I wait after filling a refillable pod before vaping?
You should wait at least 5 to 10 minutes after filling your pod with e-liquid. This gives the coil enough time to absorb the liquid and helps prevent a burnt taste.
2. What type of e-liquid should I use in a refillable pod kit?
Most refillable pod kits work best with 50/50 e-liquids or nicotine salts. Always check the manufacturer's recommendations to ensure you are using the right e-liquid for your device.
3. Why does my new pod taste burnt?
A burnt taste usually happens when the coil has not been properly primed before use. Make sure you fill the pod and leave it for 5 to 10 minutes before taking your first puff.
4. How often should I replace the coil in my pod kit?
Most coils last between 1 and 2 weeks, depending on how often you vape and the type of e-liquid you use. If you notice reduced flavour, less vapour, or a burnt taste, it may be time to replace the coil.
5. Can I refill my pod more than once?
Yes, refillable pods are designed to be used multiple times. Simply refill the pod when the e-liquid level gets low. Replace the pod or coil when performance starts to decline.
6. Why is my refillable pod kit leaking?
Leaking can happen if the pod is overfilled, not closed properly, or left in a hot environment. Make sure the filling port is securely sealed and avoid filling the pod above the recommended level.


